Blast Off with Blazor: Get to know Blazor and our project
We kick off our series by talking about Blazor, reviewing our code for the first time, and explaining how to run our project.
A couple of weeks ago, I wrote about deploying an Azure Static Web App with Blazor and Azure Functions. In that post, I talked about using the app I built as a base for an upcoming Blazor series. This is it!
We’ll be building our site from the ground up with no Blazor experience required. All you’ll need is a passing knowledge of C# and .NET. If you don’t have that, no problem: brush up on some C# (I enjoy this Learn module) and come back when you’re ready.
This post includes the following content.
What is Blazor?
If you’ve worked in the .NET ecosystem, it’s been hard to ignore the buzz around Blazor. If you’re new to Blazor or even .NET, a refresher is in order.
Blazor is a front-end (UI) framework using a single-page application model. These days, think of JavaScript libraries like React or Vue. With Blazor, you can build interactive UIs using C#. You do this by building reusable components using C#, CSS, and HTML. For when you can’t use C#, like working with a browser’s local storage, JavaScript interopability is built in. (And if you truly are allergic to JavaScript, there’s several community projects that can help you–like Blazored.)
Hosting models
If you select a Blazor project template in Visual Studio, you’ll need to pick a hosting model. Blazor offers two hosting models: Blazor Web Assembly and Blazor Server.
Blazor Web Assembly
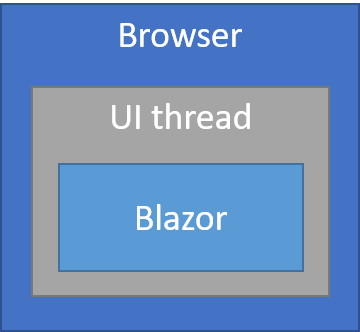
With Blazor Web Assembly—which we’ll be using in this project!—Blazor and its dependencies (including the .NET runtime!) are downloaded to the browser. The entire app executes on the browser UI thread. All app aseets, typically in wwwroot, are deployed as static files.
If you look at the footer of your generated HTML, you’ll see it uses blazor.webassembly.js. This file initializes the app’s runtime after downloading the app and its dependencies.
I’ve stolen borrowed this diagram from the Microsoft doc on the subject:
The good
- No required ASP.NET Core server or dependency on .NET server-side, meaning a serverless deployment scenario (like for this app!) is possible
- Work is completely offloaded to the client
- Docker support
The not so good
- The browser is your runtime, so I hope you like your browser
- Download size is larger, so apps take much longer to load
- Tooling support is not as great (but improving)
Blazor Server
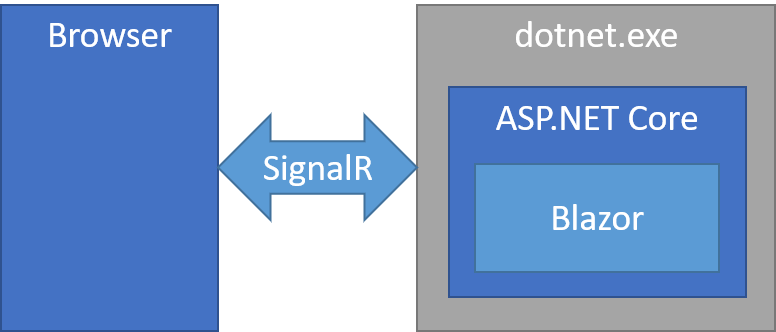
With Blazor Server, your app executes on the server from an ASP.NET Core app. Any UI updates, JavaScript calls, and event handling, is handled over a persistent SignalR connection.
I’ve once again stolen borrowed this diagram from the Microsoft doc on the subject:
The good
- Small download size and fast loading time
- You get to leverage .NET Core APIs and tooling, and share models between the client and server
- Docker support
- You don’t have to worry about WebAssembly support (although this will be less a concern), or devices that don’t have a lot of resources to work with
The not so good
- High latency, since a network call is required for each interaction
- An ASP.NET Core server is required
- No offline support like Blazor Web Assembly
We’ll learn much more about Blazor in great detail as we improve our application. So, what is this application? Keep reading for details.
Blasting off with our project
As written about previously, I’ve built an app called Blast Off With Blazor. You can see a live version at blastoffwithblazor.com and also clone the GitHub repository.
When the application loads, it calls an Azure Function. The Function, in turn, calls NASA’s Astronomy Picture of the Day (APOD) API to get a picture that is out of this world—literally. The APOD site has been serving up amazing images daily since June 16, 1995. Every time you reload the app, I’ll fetch a random image anytime between that start date and today.

Right now, it’s super simple and super slow. We’ll fix that in upcoming posts as we learn Blazor together. As we build on it, we’ll be using additional awesome NASA APIs as we learn all about …
- CSS and JavaScript isolation
- Data binding
- Event handling
- State management
- Routing
- Configuration
- Testing
- PWAs
… and so on.
For now, let’s look at the code.
Our first code review
I wanted to start with some basic functionality. Let’s look through what I set up for you.
The API project
Let’s first look at the Api project as, for now, it’s pretty simple. As I said earlier, we’re going to call the NASA APOD API. If you don’t pass a date to the API it’ll return the latest photo. I preferred to fetch a random one.
So, in ImageGet.cs, I wrote a helper GetRandomDate() function. This returns a date between June 16, 1995 (when the API started) and today.
private static string GetRandomDate()
{
    var random = new Random();
    var startDate = new DateTime(1995, 06, 16);
    var range = (DateTime.Today - startDate).Days;
    return startDate.AddDays(random.Next(range)).ToString("yyyy-MM-dd");
}
Now that we have our date, we can work on our Azure Function.
[FunctionName("ImageGet")]
public static async Task<IActionResult> Run(
    [HttpTrigger(AuthorizationLevel.Anonymous, "get", Route = "image")] HttpRequest req,
    ILogger log)
{
    log.LogInformation("Executing ImageOfDayGet.");

    var apiKey = Environment.GetEnvironmentVariable("ApiKey");
    var response = await httpClient.GetAsync($"https://api.nasa.gov/planetary/apod?api_key={apiKey}&hd=true&date={GetRandomDate()}");
    var result = await response.Content.ReadAsStringAsync();
    return new OkObjectResult(JsonConvert.DeserializeObject(result));
}
There’s actually quite a bit going on in the method signature. We start with defining an HttpTrigger, which means it’ll execute when our app calls it. We pass in an AuthLevel of Anonymous, which means the consuming app doesn’t have to pass in a function-specific API key. The Route signifies we’ll only be using GET calls, and the Route of image defines the route template (it’ll respond to api/image calls).
In the body of our method, we get our API key from our configuration and call the API—passing in our key and the date. We’ll also elect to receive HD images. Once we get a result back, we’ll deserialize it so we can pass it back to the caller.
We’ll be focusing on Blazor, obviously, and not Azure Functions. This is probably the most we’ll get into Azure Functions in these posts. If you want to learn more about Azure Functions, have at it.
The Blazor project
If you navigate to the Client project, you’ll see just one page currently in the project, under the Pages directory: Index.razor.
This .razor file is a component. In Blazor, a component is a “chunk” or “part” of the UI (like a form, page, or even something as simple as a button). In our case, the page is our component. Eventually, we’ll want to change this to make it more reusable. We’ll get there.
These component files use Razor, a combination of C# and HTML. This is very similar to what’s implemented in ASP.NET MVC or Razor Pages.
The route template
The first thing you’ll see at the top of the page is this:
@page "/"
This @page attribute signifies a route template. In our case, the root of the app. That’s all we need to know for now, but it can get a lot more complicated: you can even apply multiple route templates for a component.
The @code block
Skipping down to the bottom of the file, you’ll see a @code block—this is where we’ll define our C# code to associate with our component. As we make more complex components, we can even move this code to separate C# classes.
For now, let’s examine the @code block.
private Data.Image image;
In our Data project, we have the API model:
public class Image
{
    public string Title { get; set; }
    public string Copyright { get; set; }
    public DateTime Date { get; set; }
    public string Explanation { get; set; }
    public string Url { get; set; }
    public string HdUrl { get; set; }
}
More interestingly, we call OnInitializedAsync to fetch our image from the Azure Function:
protected override async Task OnInitializedAsync()
{
    image = await http.GetFromJsonAsync<Data.Image>("api/image");
}
Wait, what is that http reference? That’s us injecting HttpClient, from the top of the file:
@inject HttpClient http
Much like a normal .NET Core app, you can use dependency injection to inject a service into a Razor component.
The markup
Next, you’ll see us use Razor syntax to render image properties onto the page. You’ll notice I check first if the image is null before rendering. The page will certainly load before the API call completes. In those cases, the page can error out if you don’t check for it. (I also saw that sometimes the API didn’t return a Copyright, so I handled that, too.)
@if (image != null)
{
    <div class="p-4">
        <h1 class="text-6xl">@image.Title</h1>
        <p class="text-2xl">@FormatDate(image.Date)</p>
        @if (image.Copyright != null)
        {
            <p>Copyright: @image.Copyright</p>
        }
    </div>

    <div class="flex justify-center p-4">
        <img src="@image.Url" class="rounded-lg h-500 w-500 flex items-center justify-center"><br />
    </div>
}
What about CSS?
In the markup, you might be wondering about the HTML classes. With CSS for this project, Chris Sainty and Jon Hilton sold me on Tailwind CSS. Tailwind is what we call utility-first, allowing you to use a variety of classes that allows you to iterate easily. It takes a little bit to get used to, but it sure beats dropping in pre-built components that find their way everywhere (hi, Bootstrap).
I won’t be going too much in-depth on CSS, knowing my limitations, but that’s what the markup classes are for.
Run the project locally
I’d love for you to join me as we learn Blazor together. Once you clone the GitHub repo, please look at the project README.md to understand how you can get this application up and running.
Wrap up
I know this was a long “introduction” but I wanted a nice first post to explain everything. In this post, we introduced Blazor, talked about Blazor hosting options, and reviewed our code. Stay tuned and thanks for reading!