Party in the cloud with feature flags and Azure App Configuration
Learn how to integrate native .NET feature flags with Azure App Configuration.
This is part 4 in a four-part series on .NET native feature flags:
- Part 1: Introducing the
Microsoft.FeatureManagementlibrary - Part 2: Use Microsoft.FeatureManagement.AspNetCore to filter actions and HTML
- Part 3: Implement custom filters in your ASP.NET Core feature flags
- Part 4, this post: Manage feature flags with Azure App Configuration
Throughout this blog series, we’ve done a test drive on all that native .NET feature flags have to offer. We’ve created a basic toggle, filtered view components and controller actions in ASP.NET Core, and written our own filters. However, you may have noticed something: these settings are all driven by our configuration in the appsettings.json file. So, turning these flags off and on requires an update to the configuration file and a re-deploy. You can simplify this with release variables in your pipeline with your favorite tool (like Jenkins, GitHub Actions, or Azure DevOps, for example), but this is such a drag.
In this post, we’ll be able to make your life easier by storing features in Azure App Configuration. Once you connect your App Configuration instance with your app, you’ll be able to enable/disable your feature flags, literally, with a click of a button in Azure - no configuration change or redeploy required.
In the last post, we implemented functionality to display an emergency banner on our site in case unforeseen circumstances happen (go figure). It involved a verbose application setting in appsettings.json:
{
  "FeatureManagement": {
    "EmergencyBanner": {
      "EnabledFor": [
        {
          "Name": "Microsoft.TimeWindow",
          "Parameters": {
            "Start": "01 Jan 2020 12:00:00 +00:00",
            "End": "01 Jul 2020 12:00:00 +00:00"
          }
        }
      ]
    }
  }
}
With our feature in Azure App Configuration, we can remove this from our application and manage the feature, including specific time window and whether it is on or off, right in Azure. This post will refactor what we built in the last post to a cleaner solution using Azure App Configuration.
This post covers the following content.
- Project setup
- Set up Azure App Configuration
- Create new Azure App Configuration instance
- Add feature to Azure App Configuration
- Refactor (and simplify!) your application
- Add connection string to your local secrets
- Update host builder configuration
- Change view
- Clean up controller and configuration
- Next steps
Ready to party in the cloud? Of course you are. Let’s get started.
Project setup
Before getting started, please refer to the the last post by implementing the emergency banner functionality.
Once you’ve done you’ll need to install the Microsoft.Extensions.ConfigurationAzureAppConfiguration NuGet package, either from the NuGet Package Manager UI in Visual Studio or the CLI.
Once that is installed, confirm your Startup.cs file looks like the following:
public void ConfigureServices(IServiceCollection services)
{
    services.AddControllersWithViews();
    services.AddFeatureManagement().AddFeatureFilter<TimeWindowFilter>();
}
Now that we have our application set up, let’s go set up Azure App Configuration.
Set up Azure App Configuration
Before you get started with this section, confirm that you have an Azure account ready to go. Once it is, head on over to the Azure Portal at portal.azure.com. Now you’re ready to create a new Azure App Configuration instance.
Heads up! Azure is famous for continuously tweaking their UI, so screenshots may not always be up to date, but shouldn’t change too much.
Create new Azure App Configuration instance
Once you’re in the portal, do the following to create a new Azure App Configuration instance:
- Click the +Create a Resource button, in the top-left corner of the portal
- Search for App Configuration and click on the suggested result
- Click Create to begin the creation process
- Select an appropriate Azure subscription
- Select (or create a new) resource group
- Select your desired location
- Select your pricing tier. The Free tier should suffice for this demo (reference this article for a full comparison)
- Click Review + Create, then Create, to create an Azure App Configuration instance.
After a few minutes, your instance is live. Click the Go to resource button to navigate to it.
Add feature to Azure App Configuration
With an instance of Azure App Configuration, we’re now ready to add our EmergencyBanner feature flag to it.
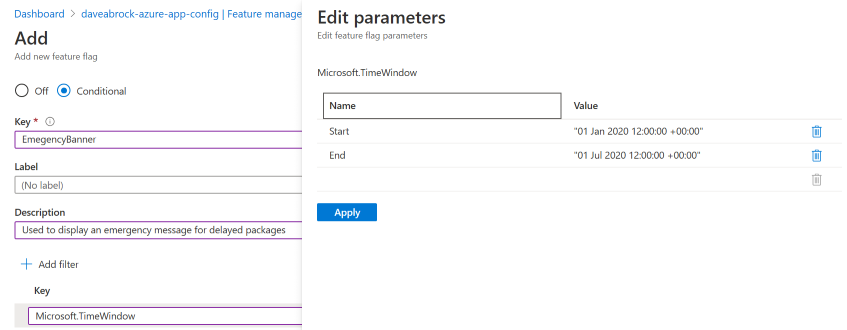
To add our feature flag in Azure App Configuration, perform the following steps:
- Click the Feature manager menu option
- Click +Add to add a feature
- Change the state to On
- For Key, enter EmergencyBanner.
- Enter some text in the Description field, such as Used to display an emergency message for delayed packages. (We left the Labels field blank, but it definitely comes in handy for grouping similar features by type or deployment environment.)
- Now, click +Add Filter to enter a date range for when this message will be active.
- For Key, enter Microsoft.TimeWindow, the namespace used in our project. Then, click the ellipses to the right, and click Edit parameters.
- Here, you will set two name/value pairs, and click Apply. It is crucially important that these are valid UTC dates. Also, if you are seeing this post past July 2020 (hello, future!) feel free to adjust the dates to your liking.
- Start: “01 Jan 2020 12:00:00 +00:00”
- End: “01 Jul 2020 12:00:00 +00:00”
Click Apply once more to create your conditional feature flag in Azure App Configuration. Here’s a snapshot of what your configuration should look like:
Great! We are now ready for refactor our application to see this in action. Before you do this, however, navigate to Access keys from your Azure App Configuration instance, and copy a connection string (primary or secondary is fine).
Refactor (and simplify!) your application
Now, we’re ready to refactor our application to reflect the new value in Azure App Configuration.
Add connection string to your local secrets
How do we bring in the feature flag we created? Well, we could paste the connection string right into our appsettings.json file, but that’s neither safe nor secure. Instead, let’s use our Secret Manager. To get started with this, right-click your solution and click Manage User Secrets. That will open a blank JSON file, where you can safely store your application secrets outside of your application configuration.
Update the file to the following:
{
  "FeatureFlagsConnectionString": "<your connection string>"
}
Update host builder configuration
Next, you will update your host builder configuration to connect to your Azure Application instance. Modify your CreateHostBuilder method in Program.cs to the following:
public static IHostBuilder CreateHostBuilder(string[] args) =>
    Host.CreateDefaultBuilder(args)
        .ConfigureWebHostDefaults(webBuilder =>
            webBuilder.ConfigureAppConfiguration((hostingContext, config) =>
            {
                var settings = config.Build();
                config.AddAzureAppConfiguration(options =>
                {
                    options.Connect(settings["FeatureFlagsConnectionString"]);
                    options.UseFeatureFlags();
                });
            })
        .UseStartup<Startup>());
What did you do here? At startup, you are connecting to your Azure App Configuration instance, with your feature flag that you specified in the Secret Manager. (For performance, if you are loading a bunch of feature flag configurations, you should consider using a sentinel key here.)
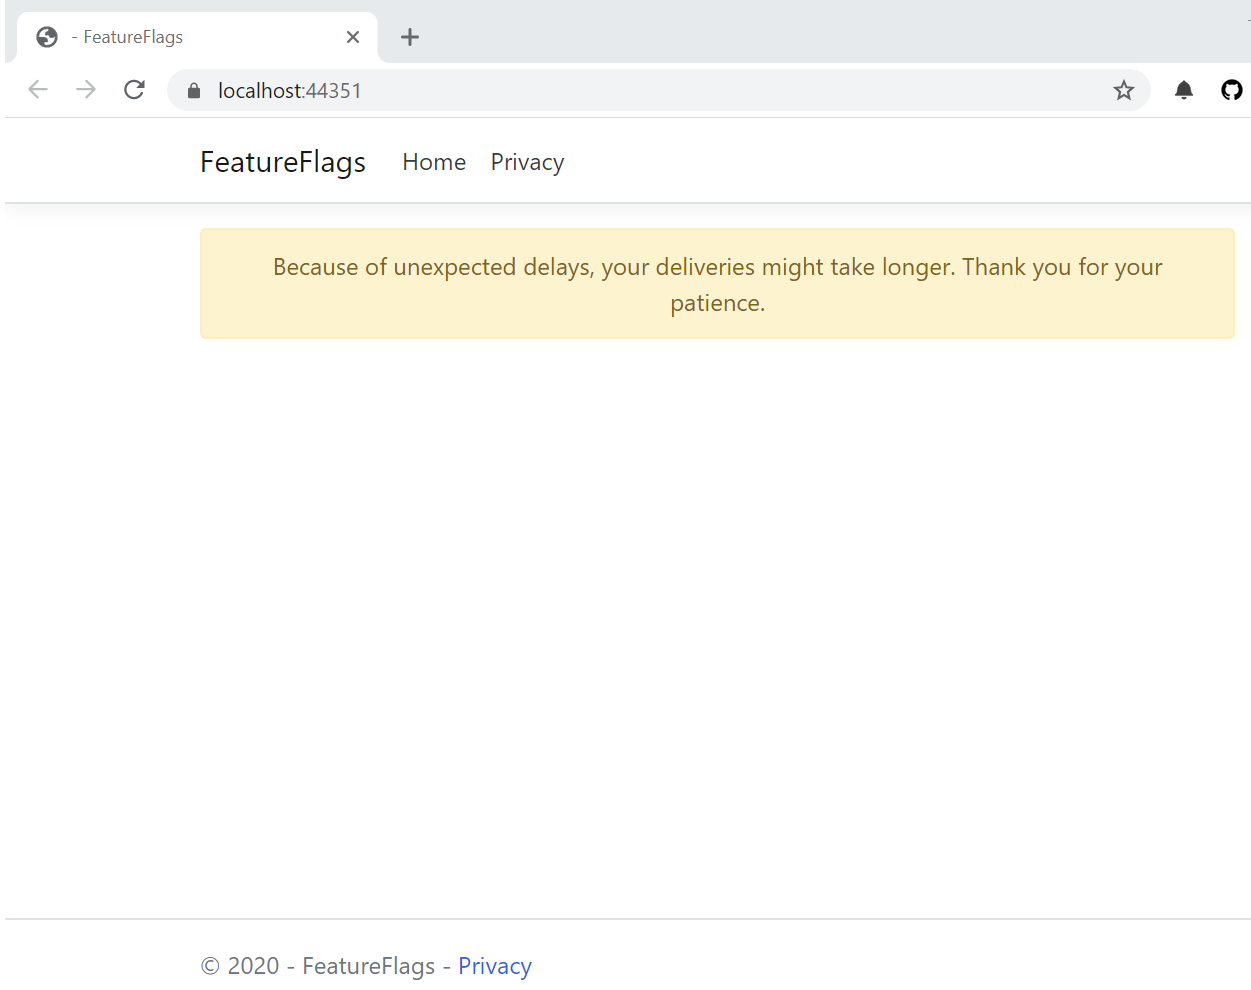
Change view
In the previous post, we had a model property that checked if a flag was active. Now, we can just do a simple check in Views/Home/Index.cshtml:
@inject Microsoft.FeatureManagement.IFeatureManager featureManager

    <div class="text-center">
        @if (await featureManager.IsEnabledAsync(FeatureFlags.EmergencyBanner))
        {
            <div class="alert alert-warning" role="alert">
                Because of unexpected delays, your deliveries might take longer. Thank you for your patience.
            </div>
        }
    </div>
Excellent! Before we run this, let’s clean up what we don’t need.
Clean up controller and configuration
Remember this mess in appsettings.json? Delete it, you don’t need it!
{
  "FeatureManagement": {
    "EmergencyBanner": {
      "EnabledFor": [
        {
          "Name": "Microsoft.TimeWindow",
          "Parameters": {
            "Start": "01 Jan 2020 12:00:00 +00:00",
            "End": "01 Jul 2020 12:00:00 +00:00"
          }
        }
      ]
    }
  }
}
Also, in your HomeController.cs, you can change back the default action to its default state:
public IActionResult Index()
{
    return View();
}
You can also delete IndexViewModel.cs, if you prefer.
Now, run the app!
Next steps
I hope you enjoyed walking through setting feature flags in Azure App Configuration. Working with the Azure UI was great, but to take it to the next level consider scripting this using the Azure CLI. Microsoft has some sample scripts to help you get started.
This completes my series on exploring .NET feature management. I hope you enjoyed it. I only scratched the surface, admittedly - go explore for yourself and let me know how you’re using it!